
Deploy and use the Portnox MCP Server
In this topic, you will learn how to deploy the Portnox MCP Server and connect an MCP-compatible AI client such as Claude Desktop. You will also find example queries and answers to frequently asked questions.
The Portnox MCP Server container (portnox-mcp)
In this topic, you will learn what the Portnox MCP Server container does, its requirements, how to deploy it, and how its update behavior works.
Overview
The Portnox MCP Server acts as a secure translation layer between AI assistants and the Portnox Cloud REST API. Rather than letting an AI model call the API directly, the server exposes a fixed set of MCP tools that map to supported Portnox operations. When an AI assistant makes a request, it calls the matching MCP tool, which authenticates to Portnox Cloud, performs the operation, and returns structured results to the AI. It is available in the public Docker repository as portnox/portnox-mcp. It has no virtual machine equivalent.
Depending on the permissions of the Portnox administrator account or token used, the server can perform both read-only operations, such as searching for devices or retrieving configuration, and administrative operations, such as updating sites, modifying network devices, or blocking and deleting endpoints. Currently supported resources are:
Network Access Servers (NAS): list switches and network devices, and batch update NAS configuration.
Sites: create, update, retrieve, and delete sites, and modify site subnet and IP range rules.
Endpoints and devices: search for managed devices, view device information, block or unblock devices, and delete devices.
The server is intended for network, security, and NAC administrators, IT operations and SOC teams, and developers building AI-driven operational workflows around Portnox Cloud, since it removes the need to build a custom integration against the REST API directly. Typical requests an AI assistant can handle through the server include finding all devices blocked today, listing switches at a specific site, blocking a specific endpoint, identifying which site contains a given subnet, updating a site’s IP ranges, or listing unmanaged endpoints that authenticated within a given period.
Requirements
You need an MCP-compatible AI client to connect to the server, such as Claude Desktop, Claude Code, GitHub Copilot, Visual Studio Code, ChatGPT, or Gemini.
You can run the container on Linux, or on Windows or macOS via Docker Desktop. If running in a VM environment, we recommend Linux for the best results, since Windows and macOS would require double virtualization.
You should use a dedicated administrator account scoped to only the permissions your intended workflows need, following the principle of least privilege, rather than a broad or personal admin account, since the server can perform administrative actions.
You must authenticate with Portnox Cloud using either a Portnox API token (recommended, provided through PORTNOX_TOKEN_FILE or PORTNOX_TOKEN), or a local Portnox administrator username and password (PORTNOX_USERNAME and PORTNOX_PASSWORD). Federated identity providers such as Microsoft Entra ID, Okta, Google Workspace, or Active Directory are not supported for this purpose.
You can enable HTTPS using either your own certificate and key files, a PKCS#12 (PFX) bundle, or nothing at all, since the server can generate a self-signed certificate automatically.
Follow the firewall rules in the following topic: How to set up the firewall for Portnox Docker containers to connect to Portnox Cloud.
Deployment
The container accepts configuration either as environment variables, or as equivalent command-line arguments appended after the image name.
Environment variables:
| Variable | Required | Default | Notes |
|---|---|---|---|
| PORTNOX_BASE_URL | Optional | https://clear.portnox.com:8081/CloudPortalBackEnd | Override only if your tenant or API base differs. |
| PORTNOX_TOKEN_FILE | Conditionally required | Empty | One authentication option. Preferred for production. |
| PORTNOX_TOKEN | Conditionally required | Empty | Used if PORTNOX_TOKEN_FILE is not set. |
| PORTNOX_USERNAME | Conditionally required | Empty | Credential authentication option, must be paired with PORTNOX_PASSWORD. |
| PORTNOX_PASSWORD | Conditionally required | Empty | Credential authentication option, must be paired with PORTNOX_USERNAME. |
| PORTNOX_TIMEOUT_SECONDS | Optional | 30 | HTTP timeout per API request. |
| PORTNOX_VERIFY_TLS | Optional | TRUE | Set to false only for troubleshooting, never in production. |
| MCP_TRANSPORT | Optional | stdio | For Docker/network usage, use streamable-http or sse. |
| MCP_HOST | Optional | 0.0.0.0 | Bind address for network transports. |
| MCP_PORT | Optional | 8765 | Listener port for network transports. |
| MCP_ALLOWED_HOSTS | Optional | * | Host header allowlist. |
| MCP_FORCE_HOST_HEADER | Optional | localhost:8765 | Rewrites the Host header before MCP transport checks. |
| MCP_ENABLE_HTTPS | Optional | FALSE | Enables the HTTPS/TLS listener. |
| MCP_TLS_CERT_FILE | Conditionally required | Empty | Required together with MCP_TLS_KEY_FILE when using a PEM/CRT pair. |
| MCP_TLS_KEY_FILE | Conditionally required | Empty | Required together with MCP_TLS_CERT_FILE. |
| MCP_TLS_PFX_FILE | Conditionally required | Empty | Alternative to the cert/key pair. The PFX/P12 file is converted automatically. |
| MCP_TLS_PFX_PASSWORD | Optional | Empty | Used only if the PFX/P12 file is password-protected. |
| MCP_TLS_CERT_DIR | Optional | /tmp/portnox-mcp-tls | Stores generated or converted certificate artifacts. |
| MCP_TLS_SELF_SIGNED_CN | Optional | localhost | Common Name used for the automatically generated self-signed certificate. |
The same options are also available as command-line arguments, appended after the image name:
| Argument | Required | Default | Notes |
|---|---|---|---|
| --transport | Optional | stdio | stdio, sse, or streamable-http. |
| --host | Optional | 0.0.0.0 | Network bind address. |
| --port | Optional | 8765 | Network port. |
| --allowed-hosts | Optional | * | Host header allowlist. |
| --force-host-header | Optional | localhost:8765 | Host header rewrite. |
| --https | Optional | FALSE | Enables HTTPS. |
| --tls-cert-file | Conditionally required | Empty | Pair with --tls-key-file. |
| --tls-key-file | Conditionally required | Empty | Pair with --tls-cert-file. |
| --tls-pfx-file | Conditionally required | Empty | Alternative to the cert/key pair. |
| --tls-pfx-password | Optional | Empty | Used only if the PFX file needs a password. |
| --tls-cert-dir | Optional | /tmp/portnox-mcp-tls | Certificate output directory. |
| --tls-self-signed-cn | Optional | localhost | Common Name for the self-signed certificate. |
| --daemon | Optional | FALSE | Not typically used in containers. |
| --pid-file | Optional | /var/run/portnox-mcp-server.pid | Relevant only with --daemon. |
| --log-file | Optional | /var/log/portnox-mcp-server.log | Relevant only with --daemon. |
| --log-level | Optional | INFO | Logging verbosity, for example DEBUG. |
| --token-file | Conditionally required | None | Command-line equivalent of PORTNOX_TOKEN_FILE. |
| --token | Conditionally required | None | Command-line equivalent of PORTNOX_TOKEN. |
| --username | Conditionally required | None | Pair with --password. |
| --password | Conditionally required | None | Pair with --username. |
Example, using credential-based authentication:
sudo docker run -p 8765:8765 \
  -e MCP_ENABLE_HTTPS='true' \
  -e PORTNOX_USERNAME='kosh@vorlon.com' \
  -e PORTNOX_PASSWORD='password' \
  portnox/portnox-mcp:latest \
  python /app/server.py --transport streamable-http --host 0.0.0.0 --port 8765
Example, using token-based authentication:
sudo docker run -p 8765:8765 \
  -e MCP_ENABLE_HTTPS='true' \
  -e PORTNOX_TOKEN='your_api_token' \
  portnox/portnox-mcp:latest \
  python /app/server.py --transport streamable-http --host 0.0.0.0 --port 8765
For a Claude Desktop-specific walkthrough, including generating a token and configuring the client, see below. For other AI clients, the MCP client configuration follows the same general pattern. If your client connects over a self-signed certificate, disable certificate validation on the client side:
{
  "mcpServers": {
    "my-server": {
      "command": "npx",
      "args": ["-y", "mcp-remote", "https://mcp_server_ip:mcp_server_port/mcp"],
      "env": {"NODE_TLS_REJECT_UNAUTHORIZED": "0"}
    }
  }
}
If you are running the server over plain HTTP instead of HTTPS, use the following client configuration instead:
{
  "mcpServers": {
    "my-mcp-server": {
      "command": "npx",
      "args": ["-y", "mcp-remote", "mcp_server_ip:mcp_server_port/mcp", "--allow-http", "--transport", "http-first"]
    }
  }
}
Troubleshooting
Set PORTNOX_VERIFY_TLS to false only when troubleshooting a TLS problem against Portnox Cloud. Do not use this in production.
Use --log-level DEBUG for more detailed log output, and --log-file to write logs to a file instead of standard output.
Adjust PORTNOX_TIMEOUT_SECONDS if requests to Portnox Cloud are timing out under normal conditions.
Updates
Deploy the Portnox MCP Server with Claude Desktop
In this topic, you will learn how to deploy the Portnox MCP Server, configure authentication, connect Claude Desktop as an MCP-compatible AI client, and verify the connection to Portnox Cloud.
Before you begin, make sure you have:
- A physical or virtual machine that can run Docker containers.
- Docker installed and running (see Portnox Tech Shorts for Linux/macOS and Windows).
- A Portnox API token or valid local Portnox administrator credentials.
- Claude Desktop installed on the same computer where you will configure the MCP client.
- Node.js and npm. The Claude
Desktop MCP configuration uses
npxto launch themcp-remotepackage, which requires Node.js and npm. - npx available in the system PATH. Verify that the
node,npm, andnpxcommands are available before configuring Claude Desktop.
-
Verify that Claude Desktop detects the Portnox MCP server.
After restarting Claude Desktop, open a new chat. You should see a tool indicator showing that the portnox MCP server is available.
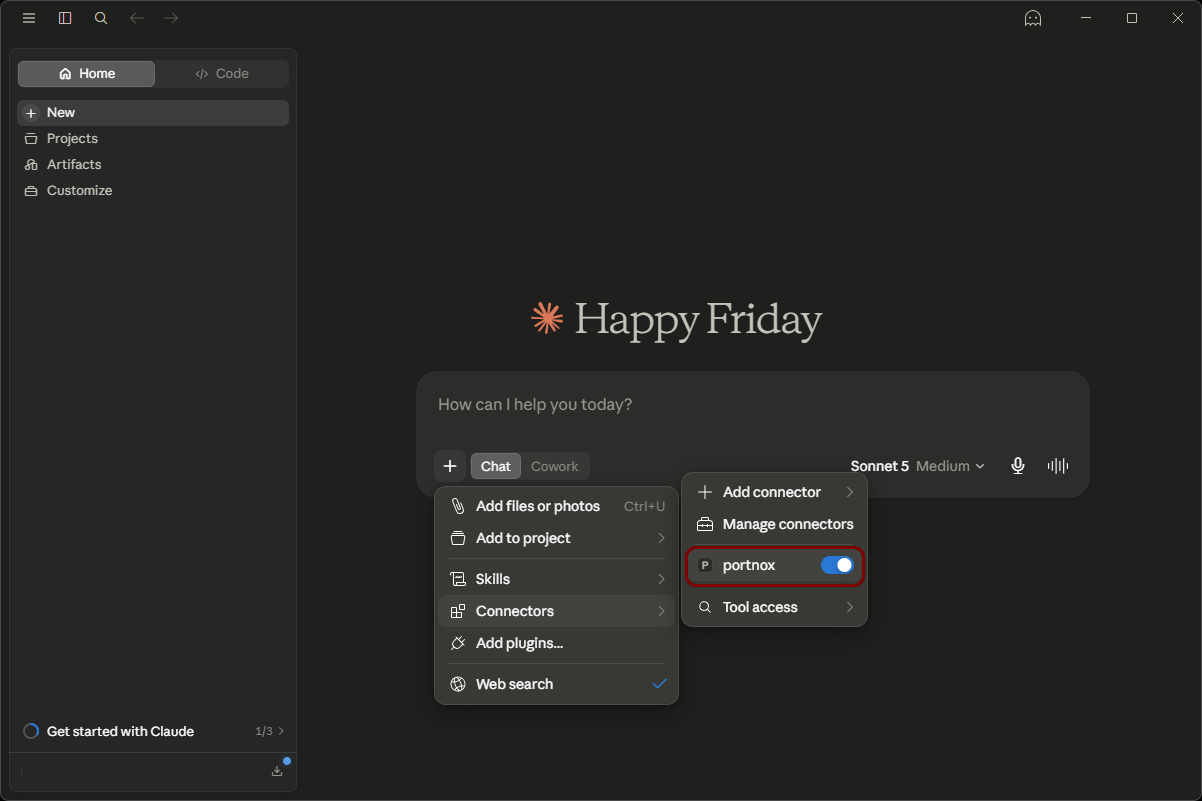
If the tool indicator does not appear, check the Docker terminal for startup errors and confirm that the JSON configuration file is valid. Also check that you have Node.js and npm installed.
Example queries
In this topic, you will find example prompts for asking an AI client about your Portnox tenant through the Portnox MCP Server. Replace anything in braces with your own value.
Looking up a specific device: you do not need a device ID. Any of the following prompts finds it.
Tell me everything about {hostname}.
What device owns MAC {mac}?
Which device is at IP {ip}?
Show me {email}’s devices.
Is {hostname} encrypted?
What OS is {hostname} running?
When did {hostname} last check in?
What applications are installed on {hostname}?
Is {hostname} domain-joined?
Who has local admin rights on {hostname}?
Checking your whole fleet: these prompts work across every device and need no identifier.
Show me every device with a risk score above {score}.
Which devices are failing policy, and why?
List all devices missing disk encryption.
Which devices have not reported in {days} days?
Show me every device marked dead.
List all {os} devices.
How many devices are running {os_version}?
Which devices have {application} installed?
Are any devices currently blocked?
Break down the fleet by operating system.
Accounts:
List all accounts.
Which accounts have no enrolled devices?
Which accounts hold a valid certificate?
Show me all accounts in group {group}.
List all LDAP accounts.
Which accounts are disabled, and why?
MAC-based (agentless) devices:
List all MAB accounts.
Which MAB account owns MAC {mac}?
Show me the whitelist for {account}.
Which whitelisted MACs expire in the next {days} days?
Show me MAB accounts with no whitelist entries.
Network infrastructure:
List all NAS devices.
Show me NAS devices not seen in {days} days.
List all sites.
Which NAS devices belong to site {site}?
What the variables mean:
| Variable | What to put there | Example |
|---|---|---|
| {hostname} | Device hostname | KOSH-VORLON-PC |
| {mac} | MAC address of any network adapter | 28:DF:EB:E6:5A:C8 |
| {ip} | IP address | 192.168.9.57 |
| {email} | Account email or DOMAIN\user | kosh@vorlon.com |
| {os} | Operating system family | Windows, iOS, macOS |
| {os_version} | Specific version | Windows 11 Home |
| {application} | Application name | Google Chrome |
| {score} | Risk score, 0 to 100 | 80 |
| {days} | Number of days | 30 |
| {group} | Group name or ID | Finance |
| {site} | Site name | Headquarters |
| {account} | Account name or ID | HP LaserJet Printers |
Portnox MCP Server FAQ
In this topic, you will find answers to frequently asked questions about the Portnox MCP Server.
- Is the Portnox MCP Server officially supported?
-
No. You cannot contact Portnox technical support for assistance deploying or configuring the Portnox MCP Server. Support is provided only through the project’s GitHub repository.
The Portnox MCP Server is a community-supported utility created to complement Portnox Cloud, and is not an official Portnox Cloud product or feature. It is provided free of charge under the Apache License 2.0, and may be used and modified in accordance with that license. It is provided as is and is not covered by Portnox technical support, SLAs, maintenance commitments, or warranties.
- How do I request a feature or report an issue with the Portnox MCP Server?
-
You can post feature requests or bug reports directly on the project’s GitHub repository, or use the Portnox Cloud feedback form for feature requests.
- Can I use my Entra ID, Okta, or other federated credentials with the Portnox MCP Server?
- No. The Portnox API does not support federated credentials from external identity providers such as Entra ID. You must use a Portnox API token with a federated account instead. However, we recommend that you create a separate local Portnox Cloud administrator account for MCP Server use.
- What permissions does the Portnox MCP Server need?
- The MCP Server operates in the context of whichever account or token you provide. For example, if the account is a read-only administrator, the MCP Server is limited to read-only operations, and cannot make any changes.
- Do actions performed through the Portnox MCP Server appear in the Portnox Cloud activity log?
- Not yet. Adding MCP Server actions to the activity log is on the roadmap, but is not yet implemented.
- Is the Portnox MCP Server tied to a specific Portnox Cloud license or subscription tier?
- No. The Portnox MCP Server is available to any Portnox Cloud customer, regardless of license tier, since it works through the same public REST API available to all customers.
- Does my AI client limit how many MCP servers I can connect at once?
- This depends on your AI client and its pricing tier, not on Portnox. For example, some AI clients only allow configuring a single MCP server on their free tier, while paid tiers may allow multiple servers, or may require a paid subscription to use any MCP server at all. Check your AI client’s current documentation, since these limits are set by the AI vendor and may change over time.
- Which AI clients can I use with the Portnox MCP Server?
- Besides Claude Desktop, used as the example in the previous topic, the Portnox MCP Server is also compatible with Claude Code, GitHub Copilot, Visual Studio Code, and other MCP-compatible AI clients such as ChatGPT and Gemini. For the current list of compatible clients, see Docker Hub.
- What operations can the Portnox MCP Server perform?
- In short, the Portnox MCP Server can perform most actions available through the Portnox Cloud REST API, such as querying, creating, and modifying NAS devices, sites, endpoints, and various account types, and executing bulk operations. The set of supported tools is updated frequently as the project develops, so see Docker Hub for the current list of supported operations rather than relying on a fixed list.
- Do I have to run the Portnox MCP Server in Docker?
- No. Besides the Docker deployment described in the previous topic, the Portnox MCP Server can also run as a Linux daemon without Docker, or as a native Claude Desktop extension with no separate server process running at all. Both alternatives require you to satisfy all software prerequisites yourself. For instructions, see the Portnox Labs MCP Server repository on GitHub.
- Is the Docker deployment of the Portnox MCP Server automatically updated?
- No. Docker deployments of the Portnox MCP Server are not currently updated by the portnox-autoupdate container. You must pull and redeploy new versions manually.