Portnox Enrollment Portal
In this topic, you will learn about the Portnox Enrollment Portal, an internal web application that allows corporate users to obtain Portnox Cloud accounts for their personal devices (BYOD) without requiring manual intervention from IT.
The tools and utilities available in the Portnox GitHub repository are created by Portnox engineers to extend and complement Portnox Cloud. They are not an integral part of the Portnox Cloud product.
As such, they are subject to the following limitations:
- They are provided free of charge and on an “as-is” basis.
- They are not covered by any Portnox Cloud service-level agreement (SLA), support contract, or product warranty.
- Portnox does not guarantee their fitness for a particular purpose, correctness, or continued maintenance.
- Use of these tools is at your own risk. Always review the code before deploying it in your environment.
For issues or questions related to these tools, refer to the repository directly. Portnox Technical Support may not be able to assist with problems arising from their use.
Enrolling a personal device using the Enrollment Portal
In this section, you will learn how to use the Enrollment Portal set up by your IT department.
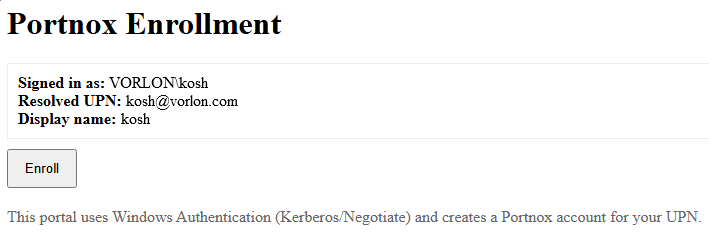
The Portnox Enrollment Portal allows you to provision an account for your personal device (BYOD) so that it can access the corporate network. The portal identifies you automatically using your corporate Windows credentials – no additional login is required. Once you request enrollment, your account credentials are sent to your corporate email address, which you can then use to connect your personal device to the network.
-
On your corporate laptop, open a web browser and navigate to the Enrollment Portal URL provided by your IT
department.
The portal uses your Windows login session to identify you automatically. You will see your name or username displayed on the page, confirming that you have been recognized.
Deploying the Enrollment Portal
In this section, you will learn how to deploy the Enrollment Portal for your corporate users.
The Portnox Enrollment Portal is an ASP.NET Core web application that integrates with Active Directory and Portnox Cloud to automate account provisioning for BYOD devices. It must be hosted on a domain-joined Windows Server running IIS, with Windows Authentication (Kerberos/Negotiate) enabled and Anonymous Authentication disabled. It communicates with your Portnox Cloud tenant via the REST API, using an API token generated in the Portnox tenant UI.
Full deployment instructions, including IIS configuration, API token setup, and application settings, are available in the Portnox Enrollment Portal README.
You can customize the code to your needs. For example, change the text displayed, add CSS styling, host securely using a domain certificate, etc.