Wi-Fi employee access – Ruckus

In this topic, you will learn how to configure Ruckus access points and controllers to authenticate Wi-Fi devices with Portnox™ Cloud using 802.1X, 802.1X over RadSec, and MAC-based authentication.

Important:
This guide gives general instructions for integrating Portnox Cloud with specific third-party devices. We try to provide useful examples for common models, but settings can differ between manufacturers, models, and environments. Because of this, we cannot guarantee these steps will work in every case. For questions or problems with RADIUS setup – which is an industry standard and not specific to Portnox – or with device-specific settings and troubleshooting, we recommend checking the device manufacturer’s documentation and contacting their support team. Portnox Support can help when possible, but detailed setup of third-party devices is usually best handled by the manufacturer. We also recommend updating your NAS device firmware to the latest version, as old firmware can cause issues.
Important:
All values in this configuration are examples. Make sure to adjust the configuration to your individual profile names, RADIUS server addresses, ports, and keys by replacing the values that are presented as underlined italics.

Ruckus Unleashed

In this section, you will learn how to configure Ruckus Unleashed access points to work together with Portnox™ Cloud.

Note:
In Ruckus Unleashed, one access point (the master access point) acts as the controller for itself and for all other Unleashed access points on the same network. You configure all access points in the web interface of the master access point.
Note:
This configuration was tested on Ruckus Unleashed with an R575 access point running Unleashed 200.19.7.112.291. The capabilities and the user interface on other versions of the platform may differ.

Add RADIUS servers

In this section, you will add the Portnox™ Cloud RADIUS servers to Unleashed as authentication and accounting servers. You will use these servers later when you configure your SSIDs.

  1. Log in to the web interface of the Unleashed master access point with your administrative credentials.
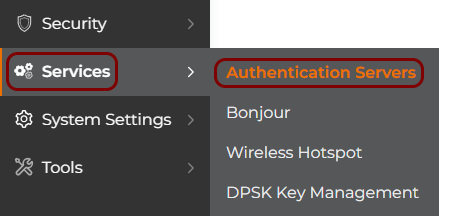
  2. In the left-hand side menu, select the Services > Authentication Servers option.

  3. Click on the Add button in the top-right corner.
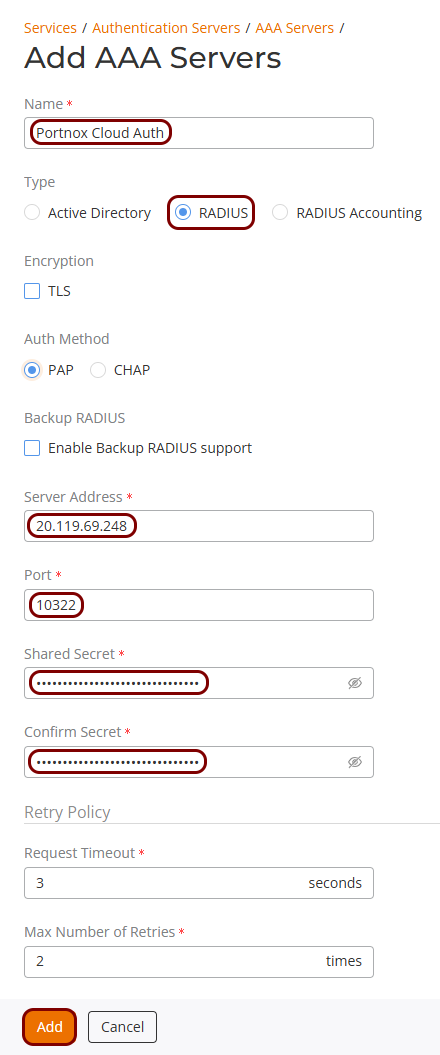
  4. Configure the authentication server:

    1. In the Name field, enter a display name for this server.
    2. In the Type field, select the RADIUS option.
    3. In the Auth Method field, keep the default PAP radio button selected.
    4. In the Server Address field, enter the Cloud RADIUS IP value from Portnox Cloud.
    5. In the Port field, enter the Authentication port value from Portnox Cloud.
    6. In the Shared Secret and Confirm Secret fields, enter the Shared Secret value from Portnox Cloud.
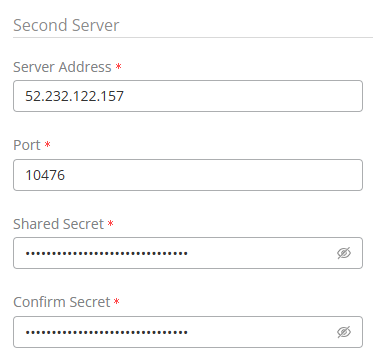
  5. Optional: If you use Cloud RADIUS servers in both regions, activate the Enable Backup RADIUS support checkbox, and in the Second Server section, enter the Server Address, Port, Shared Secret, and Confirm Secret values of the second Cloud RADIUS server.
  6. Click on the Add button.
  7. On the Authentication Servers screen, click on the Add button in the top-right corner.

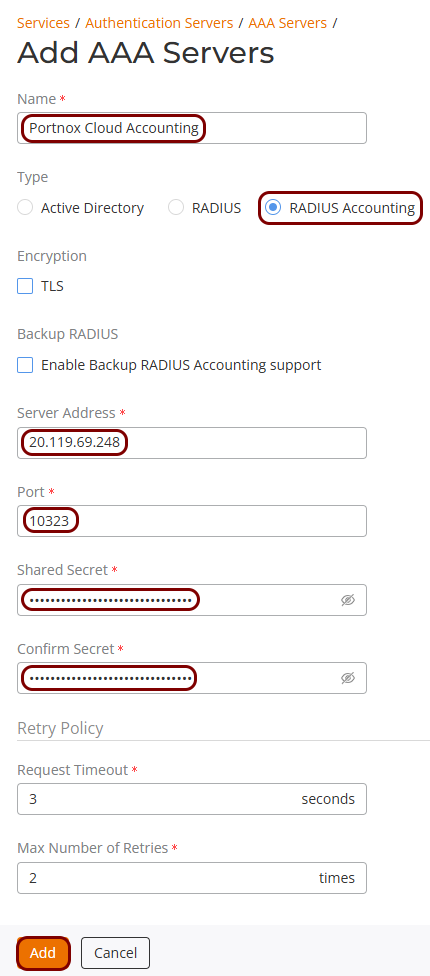
  8. Configure the accounting server:

    1. In the Name field, enter a display name for this server.
    2. In the Type field, select the RADIUS Accounting option.
    3. In the Server Address field, enter the Cloud RADIUS IP value from Portnox Cloud.
    4. In the Port field, enter the Accounting port value from Portnox Cloud.
    5. In the Shared Secret and Confirm Secret fields, enter the Shared Secret value from Portnox Cloud.
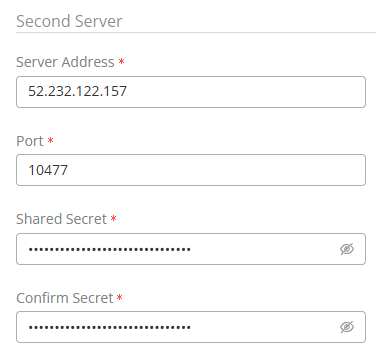
  9. Optional: If you use Cloud RADIUS servers in both regions, activate the Enable Backup RADIUS Accounting support checkbox, and in the Second Server section, enter the Server Address, Port, Shared Secret, and Confirm Secret values of the second Cloud RADIUS server.
  10. Click on the Add button.

Result: You added an authentication server and an accounting server for the Portnox Cloud RADIUS servers.

Optional: Add RadSec servers

Add servers for one-way RadSec

In this section, you will add the Cloud RADIUS certificate chain to Unleashed and add authentication and accounting servers that connect to Portnox Cloud RADIUS servers using RadSec.

Note:
In this section, you create a one-way RadSec connection. The access point verifies Portnox Cloud, but Portnox Cloud does not verify the access point. To enable mutual verification, see the next section.

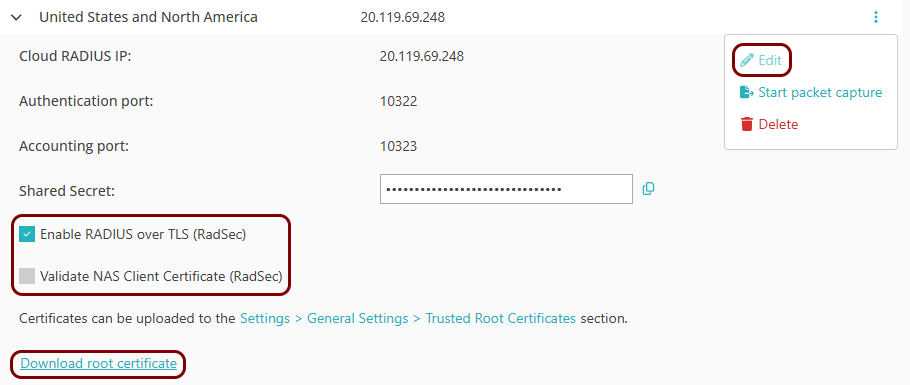
Before you begin, in Portnox Cloud, go to Settings > Services > CLOUD RADIUS SERVICE > Cloud RADIUS instance, select the relevant RADIUS instance, and select  ⋮  > Edit. Activate the Enable RADIUS over TLS (RadSec) option, disable the Validate NAS Client Certificate (RadSec) option, and click on the Save button.
  1. Download the Portnox Cloud RADIUS trust chain certificates from DigiCert, and merge them into a single file:
    1. Download the DigiCert Trusted G4 TLS RSA SHA384 2020 CA1 intermediate certificate in PEM format.
    2. Download the DigiCert Trusted Root G4 certificate in PEM format.
    3. Open both files in a text editor, and copy their content into a new file, the intermediate certificate first. Then, save the new file, for example, as digicert-chain.pem.

      The file must have this structure:

      -----BEGIN CERTIFICATE-----
      (DigiCert Trusted G4 TLS RSA SHA384 2020 CA1 intermediate certificate)
      -----END CERTIFICATE-----
      -----BEGIN CERTIFICATE-----
      (DigiCert Trusted Root G4 certificate)
      -----END CERTIFICATE-----
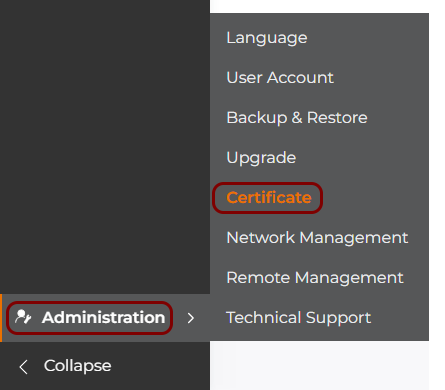
  2. In the Unleashed web interface, in the left-hand side menu, select the Administration > Certificate option.

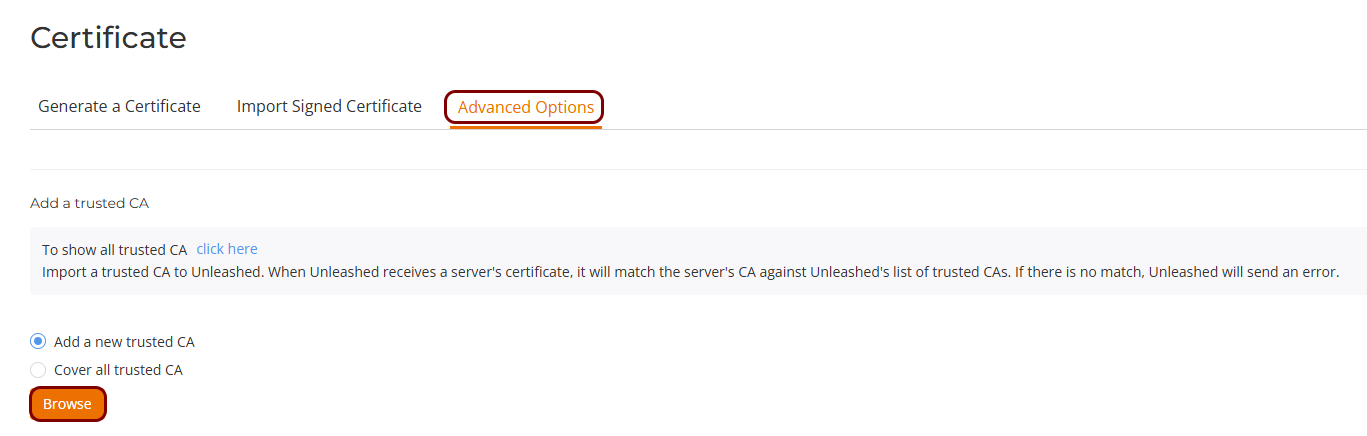
  3. On the Certificate screen, click on the Advanced Options tab, and scroll down to the Add a trusted CA section. Leave the Add a new trusted CA option selected, click on the Browse button, and select the merged certificate file.
    Warning:
    Do not upload the intermediate certificate and the root certificate as separate files instead of the merged file. RadSec does not work with separate files, because Unleashed needs both certificates in a single chain.
  4. In the left-hand side menu, select the Services > Authentication Servers option.

  5. Click on the Add button in the top-right corner.

  6. Configure the RadSec authentication server:
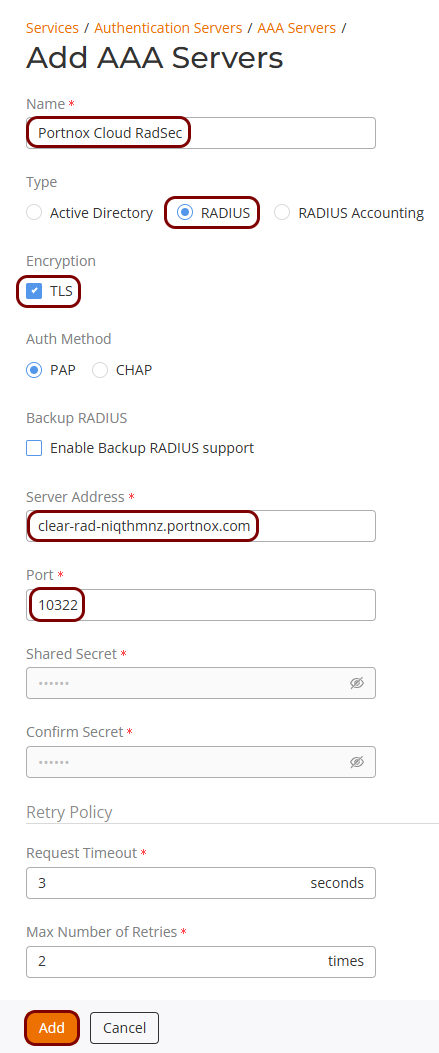
    1. In the Name field, enter a display name for this server.
    2. In the Type field, select the RADIUS option.
    3. In the Encryption section, activate the TLS checkbox.
    4. In the Auth Method field, keep the default PAP radio button selected.
    5. In the Server Address field, enter the FQDN (fully qualified domain name) of the Portnox Cloud RADIUS server, not its IP address.
      Warning:
      If you use the IP address, this configuration will not work.

      To find the FQDN of your Cloud RADIUS server, see the following topic: What are the fully qualified domain names (FQDNs) of Cloud RADIUS servers.

    6. In the Port field, enter the Authentication port value from Portnox Cloud.
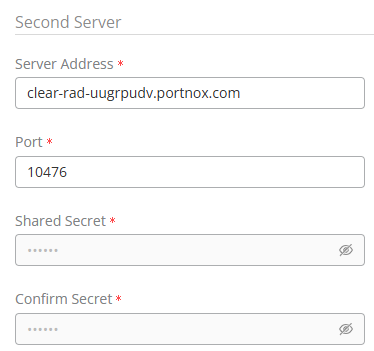
  7. Optional: If you use Cloud RADIUS servers in both regions, activate the Enable Backup RADIUS support checkbox, and in the Second Server section, enter the FQDN and the Authentication port value of the second Cloud RADIUS server in the Server Address and Port fields.
  8. Click on the Add button.
  9. On the Authentication Servers screen, click on the Add button in the top-right corner.

  10. Configure the RadSec accounting server:
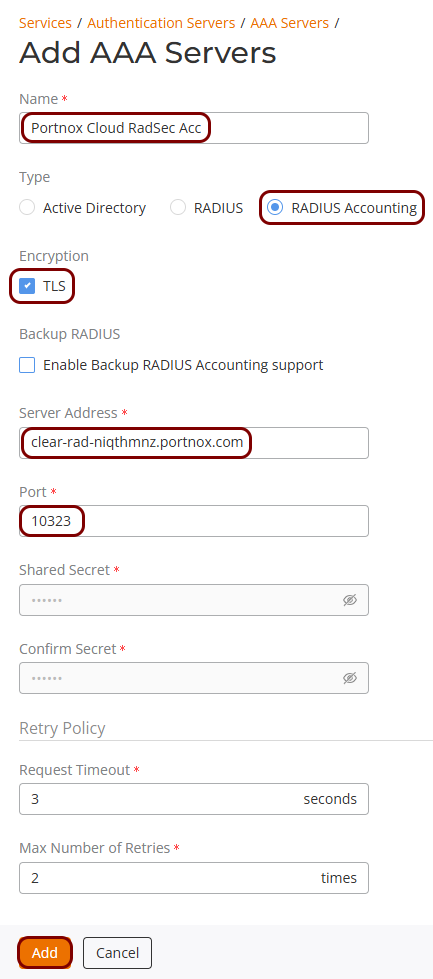
    1. In the Name field, enter a display name for this server.
    2. In the Type field, select the RADIUS Accounting option.
    3. In the Encryption section, activate the TLS checkbox.
    4. In the Server Address field, enter the FQDN (fully qualified domain name) of the Portnox Cloud RADIUS server, not its IP address.
      Warning:
      If you use the IP address, this configuration will not work.

      To find the FQDN of your Cloud RADIUS server, see the following topic: What are the fully qualified domain names (FQDNs) of Cloud RADIUS servers.

    5. In the Port field, enter the Accounting port value from Portnox Cloud.
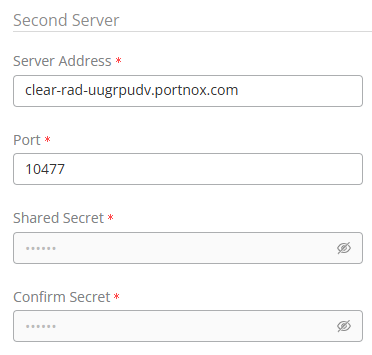
  11. Optional: If you use Cloud RADIUS servers in both regions, activate the Enable Backup RADIUS Accounting support checkbox, and in the Second Server section, enter the FQDN and the Accounting port value of the second Cloud RADIUS server in the Server Address and Port fields.
  12. Click on the Add button.

Result: You added RadSec authentication and accounting servers. When you configure an SSID, select these servers instead of the non-RadSec servers.

Optional: Configure mutual authentication (mTLS)

In this section, you will create a client certificate for the access point and configure Portnox Cloud to verify it during the RadSec connection.

Important:
Before you begin, you must complete the previous section: Add servers for one-way RadSec.
Warning:
If you configure Portnox Cloud for mTLS authentication, all your NAS devices that use RadSec with the same Cloud RADIUS instance must be configured for mTLS.
Warning:
During this procedure, the AP will reboot and may be unavailable for several minutes. Schedule the procedure for a time when employees are not using the AP.
  1. Make sure that OpenSSL is installed on your computer.

    OpenSSL is a free command-line tool for creating and managing certificates and keys. Most Linux distributions include OpenSSL by default. macOS includes a compatible openssl command. Windows does not include OpenSSL, but you can use it in Windows Subsystem for Linux (WSL), which includes OpenSSL in its default Ubuntu distribution.

    To check if OpenSSL is installed, open a command prompt or a terminal, and run the following command:

    openssl version

    If the system does not find the command, install OpenSSL:

    • On Linux, install the openssl package using the package manager of your distribution.

    • On Windows, install a third-party binary distribution. For a list of distributions, see the following page: https://github.com/openssl/openssl/wiki/Binaries. Git for Windows also includes OpenSSL, which you can use in Git Bash.

  2. Open a command prompt or a terminal, and run the following OpenSSL commands:
    openssl req -x509 -newkey rsa:2048 -sha256 -days 3650 -nodes -keyout ruckus-client-ca.key -out ruckus-client-ca.crt -subj "/CN=ruckus-client-ca"
    openssl req -x509 -newkey rsa:2048 -sha256 -days 825 -nodes -keyout unleashed.key -out unleashed.crt -subj "/CN=unleashed.ruckuswireless.com" -CA ruckus-client-ca.crt -CAkey ruckus-client-ca.key -addext "basicConstraints=CA:FALSE" -addext "keyUsage=digitalSignature,keyEncipherment" -addext "extendedKeyUsage=clientAuth,serverAuth" -addext "subjectAltName=DNS:unleashed.ruckuswireless.com"
    Note:
    These commands require OpenSSL 3.0 or later. To check your version, run the following command: openssl version.

    These commands create your own certificate authority and use it to sign a client certificate for the access point. You need three of the resulting files:

    • ruckus-client-ca.crt: the certificate authority, which you upload to Portnox Cloud.

    • unleashed.crt: the client certificate, which you upload to Unleashed.

    • unleashed.key: the private key of the client certificate, which you upload to Unleashed.

    Important:
    Keep the ruckus-client-ca.key file in a secure location. Anyone with this file can issue certificates that Portnox Cloud trusts.
  3. In the Unleashed web interface, in the left-hand side menu, select the Administration > Certificate option.

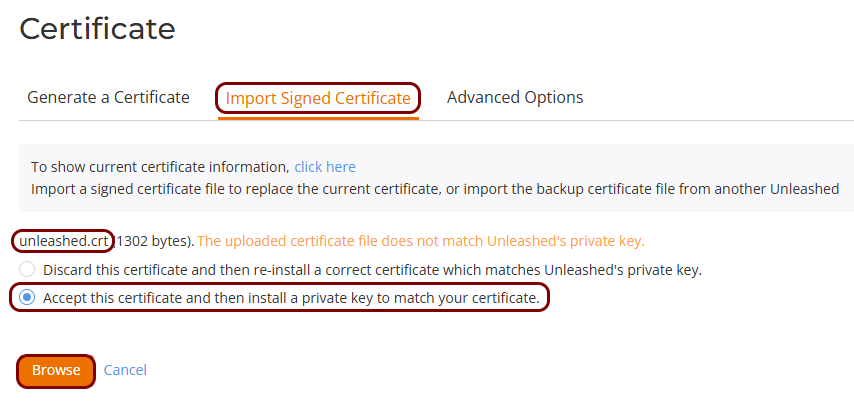
  4. Click on the Import Signed Certificate tab, click on the Browse button, select the unleashed.crt file, and then select the Accept this certificate and then install a private key to match your certificate option.
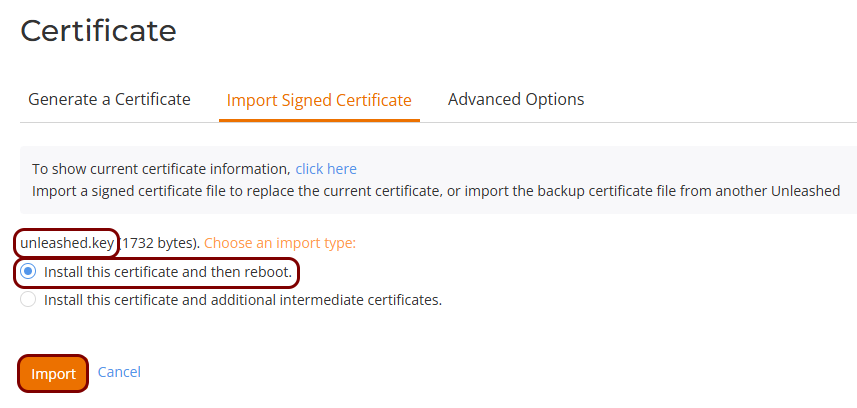
  5. Click on the Browse button, and select the unleashed.key file. Leave the Install this certificate and then reboot option selected, and click on the Import button.
    Warning:
    The access point restarts and uses the new certificate. This can take a few minutes.
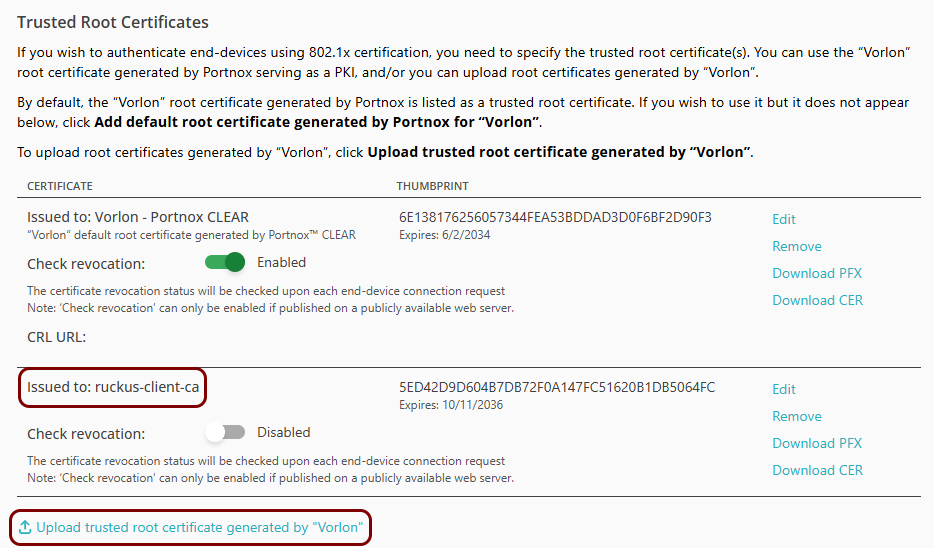
  6. In Portnox Cloud, go to Settings > Services > GENERAL SETTINGS > Trusted Root Certificates, and upload the ruckus-client-ca.crt file.
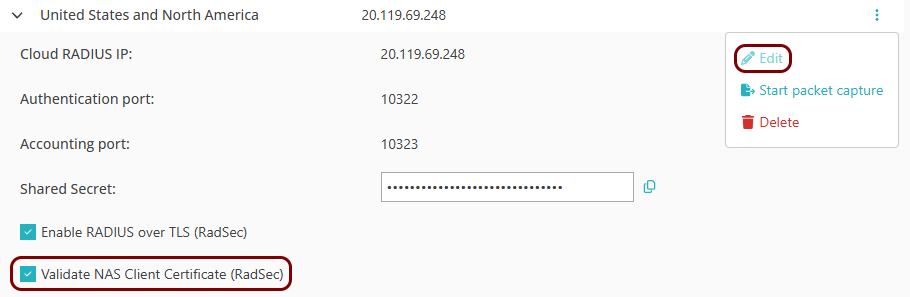
  7. Go to Settings > Services > CLOUD RADIUS SERVICE > Cloud RADIUS instance, select the relevant RADIUS instance, select  ⋮  > Edit, activate the Validate NAS Client Certificate (RadSec) option, and click on the Save button.
    Important:
    Complete this step only after the access point restarts with the new certificate. Otherwise, the RadSec connection fails.

Result: The access point and Portnox Cloud authenticate each other when the access point connects using RadSec. SSIDs that use the RadSec servers need no changes.

Create an SSID for 802.1X authentication

In this section, you will create an SSID and configure it for WPA2/WPA3 Enterprise authentication, using the servers that you created earlier.

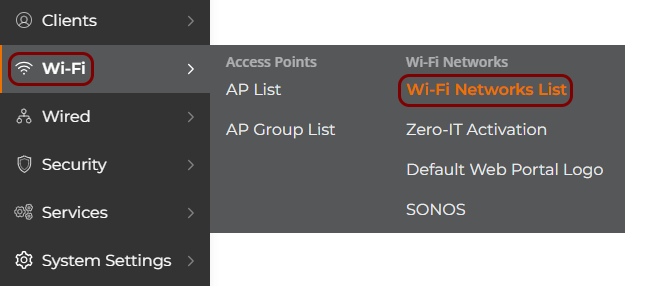
  1. In the left-hand side menu, select the Wi-Fi > Wi-Fi Networks List option.

  2. Click on the Add button in the top-right corner.

  3. In the Network Details section, configure the SSID:
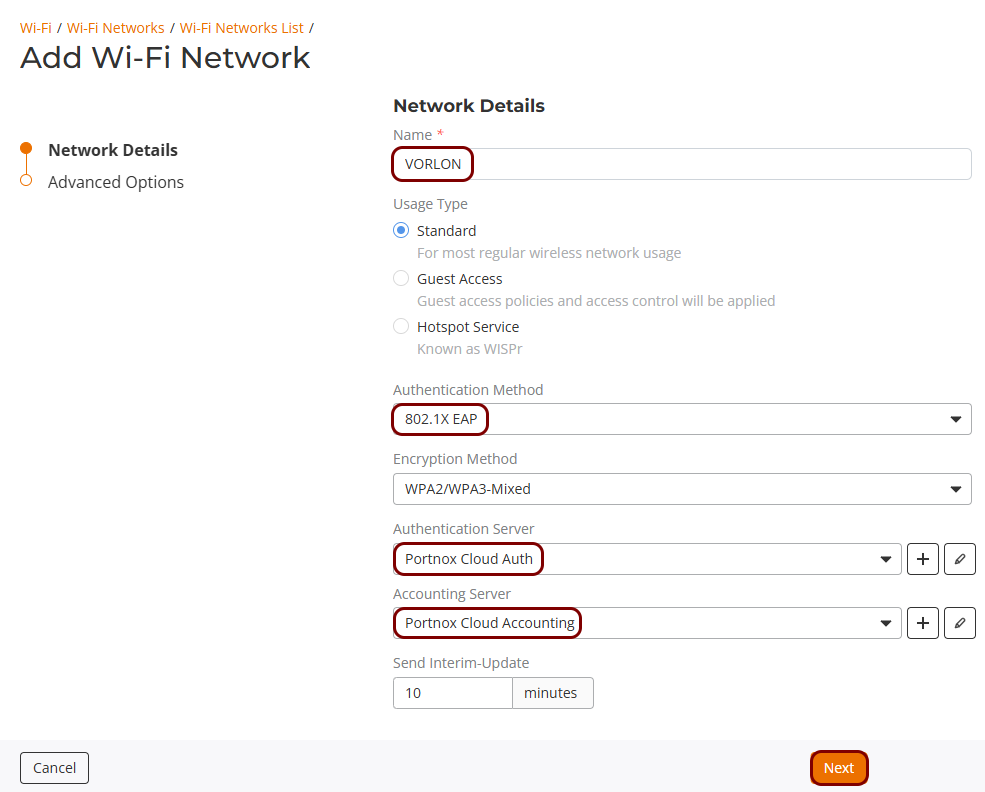
    1. In the Name field, enter the network name that devices see when they search for Wi-Fi networks.
    2. In the Usage Type field, keep the default Standard option selected.
    3. In the Authentication Method field, select the 802.1X EAP option.
    4. Leave the Encryption Method field set to its default WPA2/WPA3-Mixed value.
      Note:
      You can also select the WPA2 or the WPA3 option instead. The authentication configuration is identical.
    5. In the Authentication Server field, select the authentication server that you created earlier.
      Note:
      To use RadSec, select the RadSec authentication server instead.
    6. In the Accounting Server field, select the accounting server that you created earlier.
      Note:
      To use RadSec, select the RadSec accounting server instead.
  4. Click on the Next button, leave the settings in the Advanced Options section at their default values, and click on the Add button.

Result: You created an SSID that authenticates employee Wi-Fi devices using 802.1X and the Portnox Cloud RADIUS servers.

Optional: Create an SSID for MAC-based authentication

This is an optional task. Follow this task only if you want to authenticate devices, such as IoT devices, that do not support 802.1X, using their MAC address instead. Skip this task if you do not need MAC-based authentication.

Note:
This documentation does not include an IPSK guide because Portnox Cloud does not currently support IPSK authentication with Ruckus DPSK (Dynamic PSK).
  1. In the left-hand side menu, select the Wi-Fi > Wi-Fi Networks List option.

  2. Click on the Add button in the top-right corner.

  3. In the Network Details section, configure the SSID:
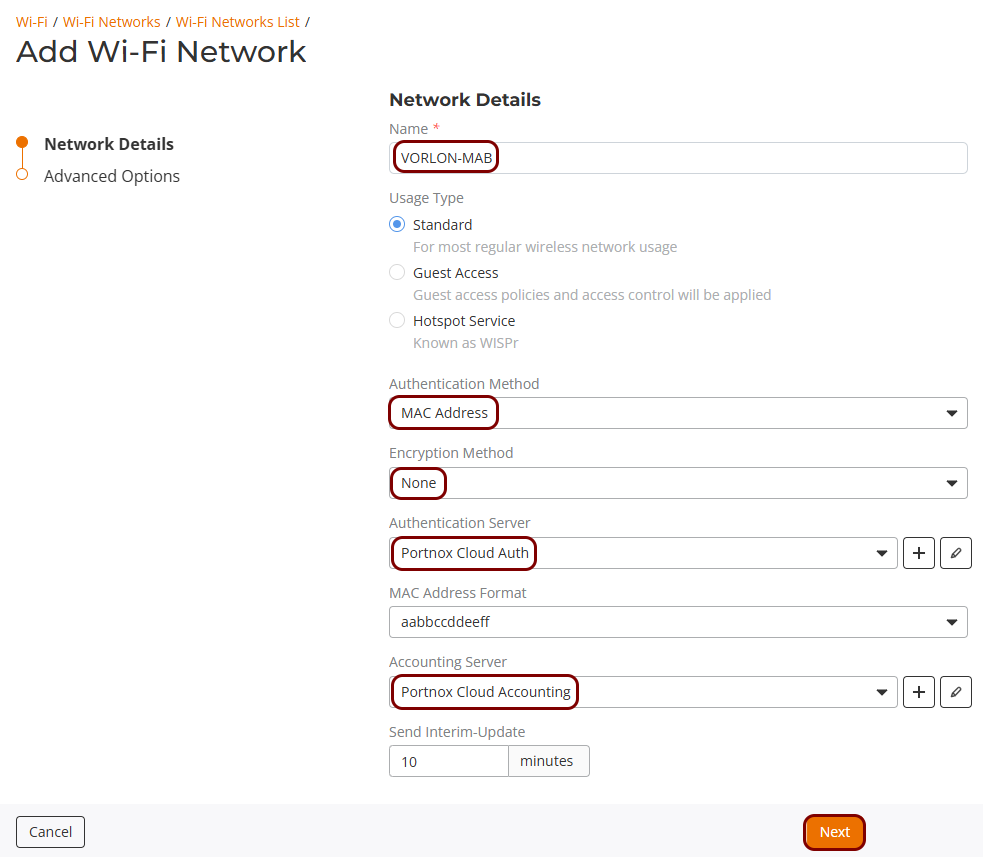
    1. In the Name field, enter the network name that devices see when they search for Wi-Fi networks.
    2. In the Usage Type field, keep the default Standard option selected.
    3. In the Authentication Method field, select the MAC Address option.
    4. In the Encryption Method field, select the None option.
    5. In the Authentication Server field, select the authentication server that you created earlier.
      Note:
      To use RadSec, select the RadSec authentication server instead.
    6. In the MAC Address Format field, leave the default aabbccddeeff option selected.
    7. In the Accounting Server field, select the accounting server that you created earlier.
      Note:
      To use RadSec, select the RadSec accounting server instead.
  4. Click on the Next button, leave the settings in the Advanced Options section at their default values, and click on the Add button.

Result: You created a separate SSID that authenticates IoT devices by their MAC address using the Portnox Cloud RADIUS servers on the basis of MAC-based accounts.

Legacy setups

The following section applies only to older Ruckus setups.

Warning:
This topic contains documentation prepared by our support agents more than 12 months ago. It may not cover the newest models or the newest interfaces of NAS devices. We’re working on bringing you updated documentation for NAS devices in the near future. However, the methods of setting up third-party devices may still change when the manufacturers update their firmware or release new models.

ZoneDirector

The following is a configuration process for the Ruckus ZoneDirector series of controllers, based on ZoneDirector 1200.

  1. In the ZoneDirector web interface, navigate to Configure > AAA Servers, and click on Create New to add a RADIUS server.
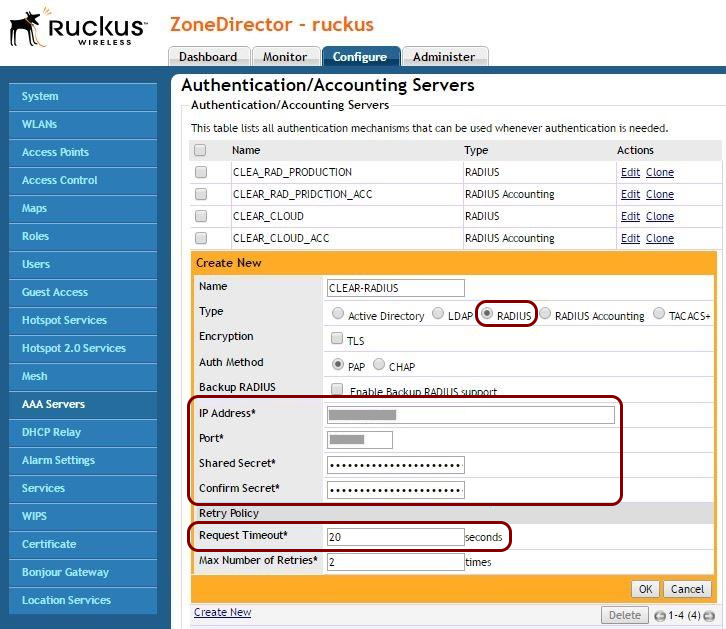
    1. Specify a Name for the RADIUS server.
    2. In the Type selection, select RADIUS.
    3. Set the Request Timeout to 20 seconds.
    4. Enter your Cloud RADIUS details.
  2. Navigate to Configure > AAA Servers, and click on Create New to add a RADIUS accounting server.
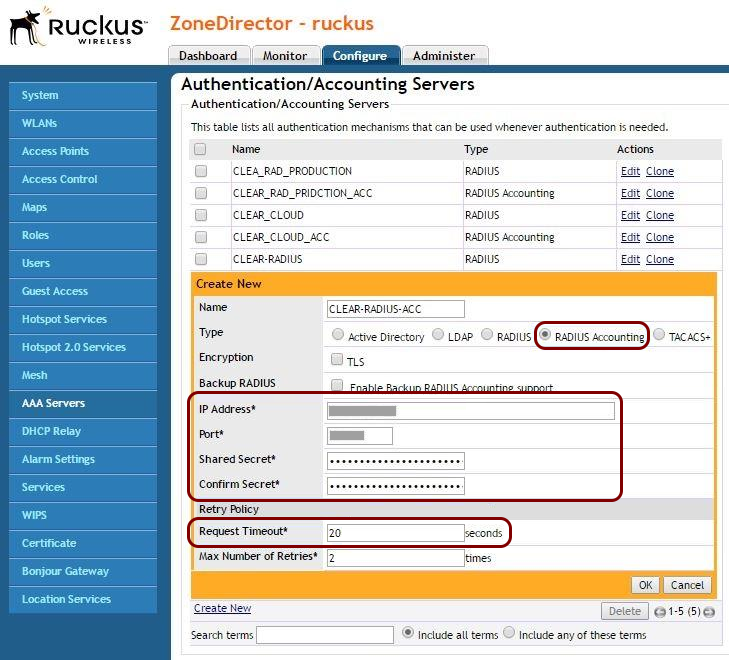
    1. Specify a Name for the RADIUS accounting server.
    2. In the Type selection, select RADIUS Accounting.
    3. Set the Request Timeout to 20 seconds.
    4. Enter your Cloud RADIUS details.
      Note:
      The server IP and the secret are the same for both authentication and accounting, only ports are different.
  3. Navigate to Configure > WLANs, and click on Create New to add a new WLAN.
    Note:
    You can also edit an existing WLAN instead.
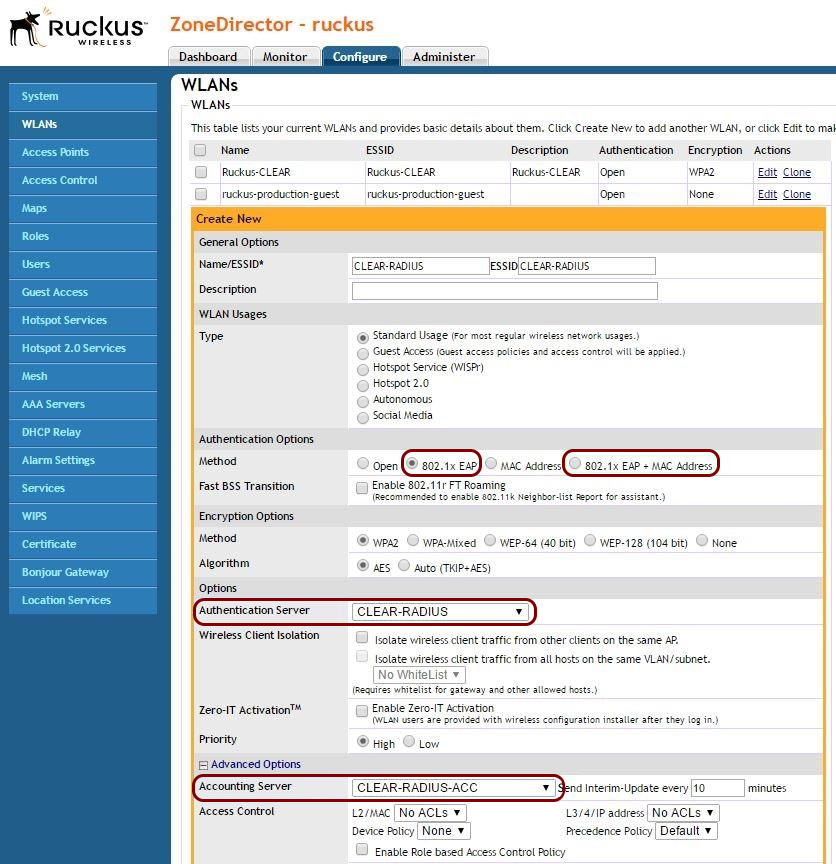
    1. Specify a Name/ESSID for the WLAN (its SSID).
    2. In Authentication Options, as Method, select 802.1x EAP, if you want to authenticate devices using RADIUS only, or 802.1x EAP + MAC Address if you want to also be able to authenticate IoT devices using their MAC addresses.
    3. In Authentication Server, select the RADIUS server that you created in previous steps.
    4. In Accounting Server, select the RADIUS accounting server that you created in previous steps.