In this topic, you will learn how to create downloadable access lists (dACLs) on Cisco switches using the Portnox™ Cloud dACL
Policy Builder.
Note: Portnox Cloud supports downloadable ACLs for most NAS devices from most popular manufacturers, not only Cisco.
Important: Portnox Cloud lets you create downloadable ACLs using either the DACL Policy
Builder, as described here, or as a Custom dACL, where you can simply copy and paste
your existing downloadable ACL that you have defined somewhere else.
Warning: We tested this configuration on several models and several versions of Cisco switches but we cannot
guarantee that it will cover every Cisco model. Therefore, to get the most accurate and current configuration guidance on
dACL configuration, we strongly recommend that you refer to the documentation provided by Cisco on these topics for your
particular device model.
-
Enable IP device tracking.
To use dACLs on a Cisco switch, you must enable IP device tracking. This allows the switch to populate a source IP
address (or destination dACL for return traffic) in the dACL. Without IP device tracking enabled, downloadable ACL
assignment will not work.
- For IOS version ≤ 15.0: IP device tracking is disabled by default.
- For IOS version = 15.1: We could not find information regarding this version. We recommend entering the command
to enable IP device tracking as a precaution.
- For IOS version ≥ 15.2 with dot1x enabled, IP device tracking is enabled by
default.
-
Enter the following AAA commands in config mode. These commands are required for dACL assignment to work.
radius-server vsa send authentication
radius-server vsa send accounting
aaa authorization network default group radius local
-
Configure the custom dACL in Portnox Cloud.
Important:
- The source IP address must always be set to ANY (when configuring in Portnox Cloud,
just leave it empty to set it to ANY). Cisco uses IP device tracking to auto-populate
the source address and port in the dACL.
- The first dACL rules must be set up to allow for DHCP traffic to be exchanged. This can be done by adding
both DHCP UDP (68) and BootP UDP (67) ports. DHCP requests initiate on UDP port 67 but are changed by the
DHCP server to UDP port 68 when responding. Without both these lines, a DHCP request will not be
successful.
- The last line of the dACL must be a DENY ALL or PERMIT ALL.
Most likely this will be a DENY ALL.
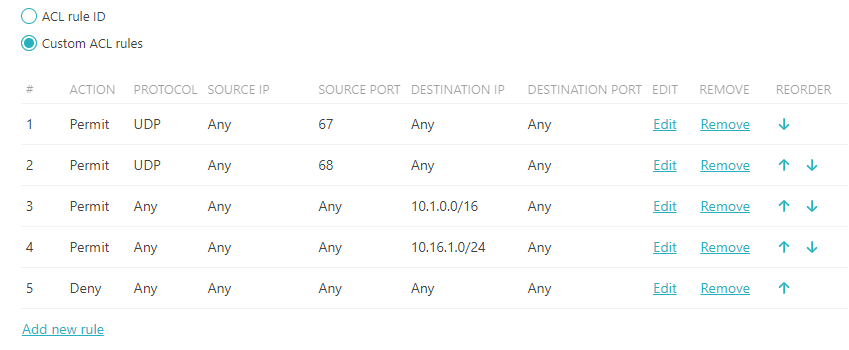
The following is an example dACL restricting an authenticated device to two subnets. The subnets are 10.1.0.0/16 and
10.16.1.0/24.

-
Verify and troubleshoot.
You can use the following commands to verify that the dACL has been assigned. Critical data is highlighted.
-
Show interface details.
show authentications session interface interface_name details
For example:
show authentication sessions gigabitEthernet 1/0/10 details

Interface:  GigabitEthernet1/0/10
MAC Address:  3c18.a00c.484c
IPv6 Address:  Unknown
IPv4 Address:  10.2.64.91
User-Name:  kosh@vorlon.com
Status:  Authorized
Domain:  DATA
Oper host mode:  multi-domain
Oper control dir:  both
Session timeout:  N/A
Restart timeout:  N/A
Periodic Acct timeout:  N/A
Session Uptime:  22s
Common Session ID:  0A02190B000000501E910A42
Acct Session ID:  Unknown
Handle:  0xE200001A
Current Policy:  POLICY_Gi1/0/10

Local Policies:
Service Template: DEFAULT_LINKSEC_POLICY_SHOULD_SECURE (priority 150)

Server Policies:
Per-User ACL:  GigabitEthernet1/0/10#v4#7205C4C
:  permit 17 any eq 68 any
:  permit 17 any eq 67 any
:  permit ip any 10.2.0.0 0.0.255.255
:  permit ip any 10.21.0.0 0.0.255.255
:  permit ip any 10.48.0.0 0.0.255.255
:  permit ip any 10.64.0.0 0.0.255.255
:  deny ip any any

Method status list:
Method            State

dot1x              Authc Success
-
Show access list.
show access list acl_name
show access list GigabitEthernet1/0/10#v4#7205CF4

Extended IP access list GigabitEthernet1/0/10#v4#7205CF4 (per-user)
100 permit udp any any eq bootpc
101 permit ip any 10.2.0.0 0.0.255.255
102 permit ip any 10.21.0.0 0.0.255.255
103 permit ip any 10.48.0.0 0.0.255.255
104 permit ip any 10.64.0.0 0.0.255.255
105 deny ip any any
-
Debug the configuration if needed.
You can use the following tools when debugging dACL assignment:
- PCAP: Verify that Access-Accept is being delivered to the endpoint.
- debug radius all: Verify that the dACL is passed to the RADIUS server.
001567: May  7 13:46:15.269: RADIUS: Received from id 1645/111 13.90.229.234:10330, Access-Accept, len 407
001568: May  7 13:46:15.270: RADIUS:  authenticator 22 E2 C9 E9 88 E8 82 58 - F6 09 C9 D1 5F 2C 5A 78
001569: May  7 13:46:15.270: RADIUS:  Vendor, Microsoft   [26]  58
001570: May  7 13:46:15.270: RADIUS:   MS-MPPE-Recv-Key   [17]  52  *
001571: May  7 13:46:15.270: RADIUS:  Vendor, Microsoft   [26]  58
001572: May  7 13:46:15.270: RADIUS:   MS-MPPE-Send-Key   [16]  52  *
001573: May  7 13:46:15.270: RADIUS:  Vendor, Cisco       [26]  44
001574: May  7 13:46:15.270: RADIUS:   Cisco AVpair       [1]   38  "ip:inacl#100=permit 17 any eq 68 any"
001575: May  7 13:46:15.270: RADIUS:  Vendor, Cisco       [26]  44
001576: May  7 13:46:15.270: RADIUS:   Cisco AVpair       [1]   38  "ip:inacl#100=permit 17 any eq 67 any"
001577: May  7 13:46:15.270: RADIUS:  Vendor, Cisco       [26]  72
001578: May  7 13:46:15.270: RADIUS:   Cisco AVpair       [1]   66  "ip:inacl#101=permit ip 10.2.0.0 0.0.255.255 10.2.0.0 0.0.255.255"
001579: May  7 13:46:15.270: RADIUS:  Vendor, Cisco       [26]  74
001580: May  7 13:46:15.270: RADIUS:   Cisco AVpair       [1]   68  "ip:inacl#102=permit ip 10.21.0.0 0.0.255.255 10.21.0.0 0.0.255.255"
001581: May  7 13:46:15.270: RADIUS:  Vendor, Cisco       [26]  36
001582: May  7 13:46:15.270: RADIUS:   Cisco AVpair       [1]   30  "ip:inacl#103=deny ip any any"
001583: May  7 13:46:15.270: RADIUS:  User-Name           [1]   21  "kosh@vorlon.com"

