Integrate Synology NAS with Zero Trust Network Access
In this topic, you will find general instructions on how to integrate a Synology NAS with Portnox™ Zero Trust Network Access.
Prerequisites:
-
Your Synology NAS must be accessible using a domain name.
SAML integration does not work with an IP address alone. This is because the SAML configuration uses the domain name as the Entity ID.
To give your Synology NAS a domain name, use one of these options:
-
Use a local DNS server.
-
Create a hosted ZTNA configuration for the NAS. This also lets remote employees access the on-premises NAS without a VPN.
A hosted ZTNA configuration lets you use your own domain name, or it automatically assigns a portnox.com subdomain, which you can use as the Entity ID in your SAML configuration.
You can configure the domain for your Synology NAS by clicking on the Control Panel icon, then clicking on the Login Portal icon, and entering the domain name in the Customized domain field.
-
-
We strongly recommend integrating your Synology NAS with your authentication repository, such as Entra ID or Google Workspace.
-
If you integrate with your repository using LDAP:
-
User accounts are synchronized directly from your repository, so usernames stay consistent automatically. No additional configuration is needed for username mapping.
-
Entra ID: You must use Microsoft Entra Domain Services – a separate paid Azure service that provides a managed LDAP endpoint and syncs users from Entra ID.
-
Google Workspace: LDAP integration requires the Secure LDAP service, which is not available on Business Starter or Business Standard plans. It is available on Business Plus and all Enterprise and Education plans.
-
-
If you do not integrate with your repository:
-
You must create all NAS users manually. You cannot use the @ symbol in the names of users created manually. We strongly recommend that you use the same username as in user emails. For example, create a user kosh if their company email is kosh@vorlon.com.
-
You must create a separate Identity Provider configuration in Portnox Cloud – for example, Entra ID or Google Workspace. This is because Synology NAS requires the NameID claim to contain the Synology username. How you provide this depends on your repository:
-
Entra ID provides a Display Name attribute, which stores the username without the domain part (for example, kosh from kosh@vorlon.com). You can map this attribute directly to the NameID claim, so no custom fields are needed.
-
The Google Workspace repository only contains fields for email address, first name, and last name. It has no fields that store the username without the domain part, and there is no function to obtain it automatically. Therefore, you must create a custom field in Google Workspace (for example, Displayname) and manually fill it for every user that needs access to the Synology NAS.
-
-
-
Assumptions for this guide:
-
We assume that you use a local DNS server or your own domain in a hosted ZTNA configuration, and that your NAS has the domain name: nas.vorlon.com.
-
We assume that you did not integrate with the repository using LDAP and that you used the same usernames for Synology users as your users’ emails. We will show you how to create and configure custom claims.
Integrating a Synology NAS with an LDAP service provided by Entra ID or Google Workspace is a complex process that is outside the scope of this guide, as it is unrelated to SAML and ZTNA. If you integrated with your repository using LDAP, do not create a new IdP and do not add any custom claims, as the NAS will work with your default IdP and claims configuration.
Create a new identity provider configuration to support Synology
In this section, you will create a new identity provider configuration for Synology NAS and configure its claims.
-
If you use Entra ID, open your Synology ZTNA application configuration and do the following steps.
-
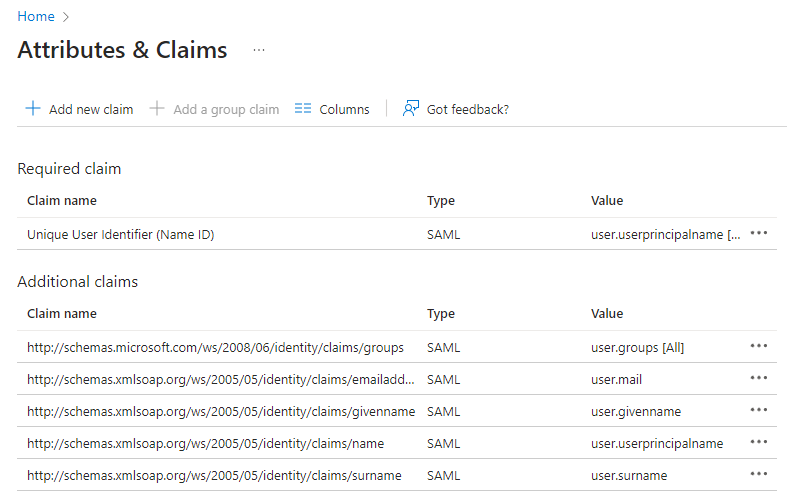
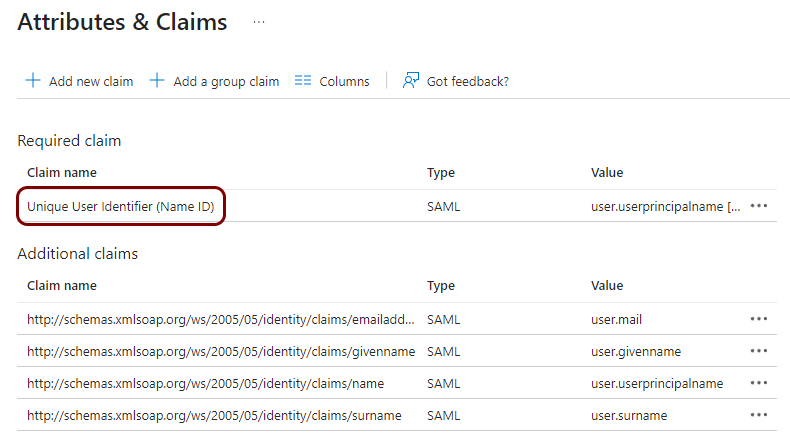
Open the Attributes & Claims pane ().
-
Click on the Unique User Identifier (Name ID) claim to open its configuration.
-
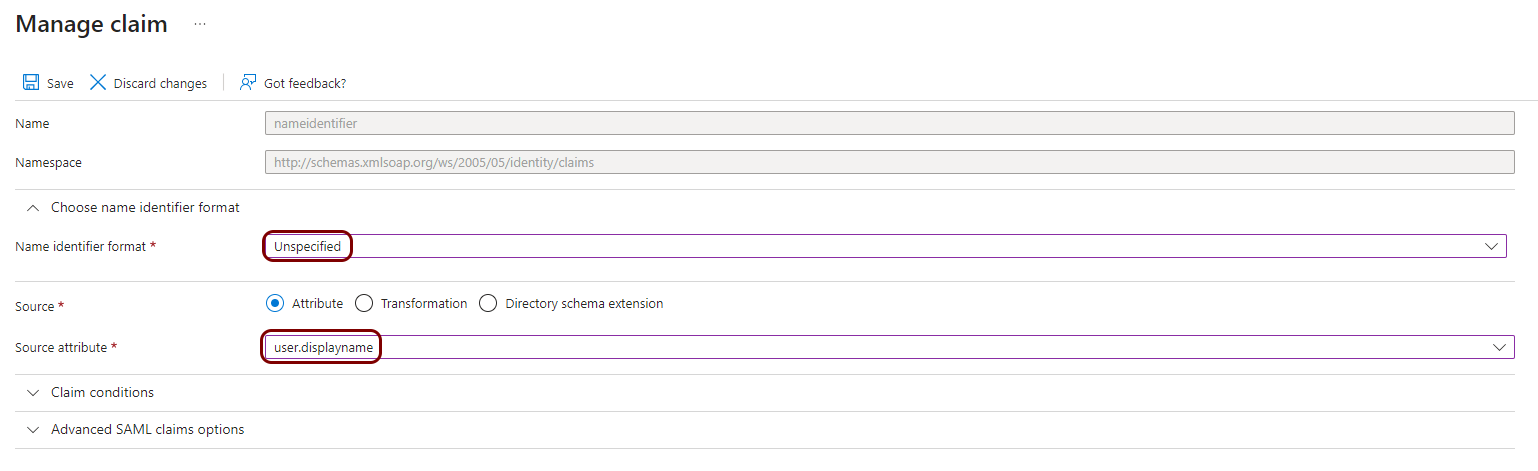
In the Name identifier format field, select the Unspecified
option, and in the Source attribute field, select the
user.displayname option.
-
Open the Attributes & Claims pane ().
-
If you use Google Workspace, open your configuration and do the following steps.
-
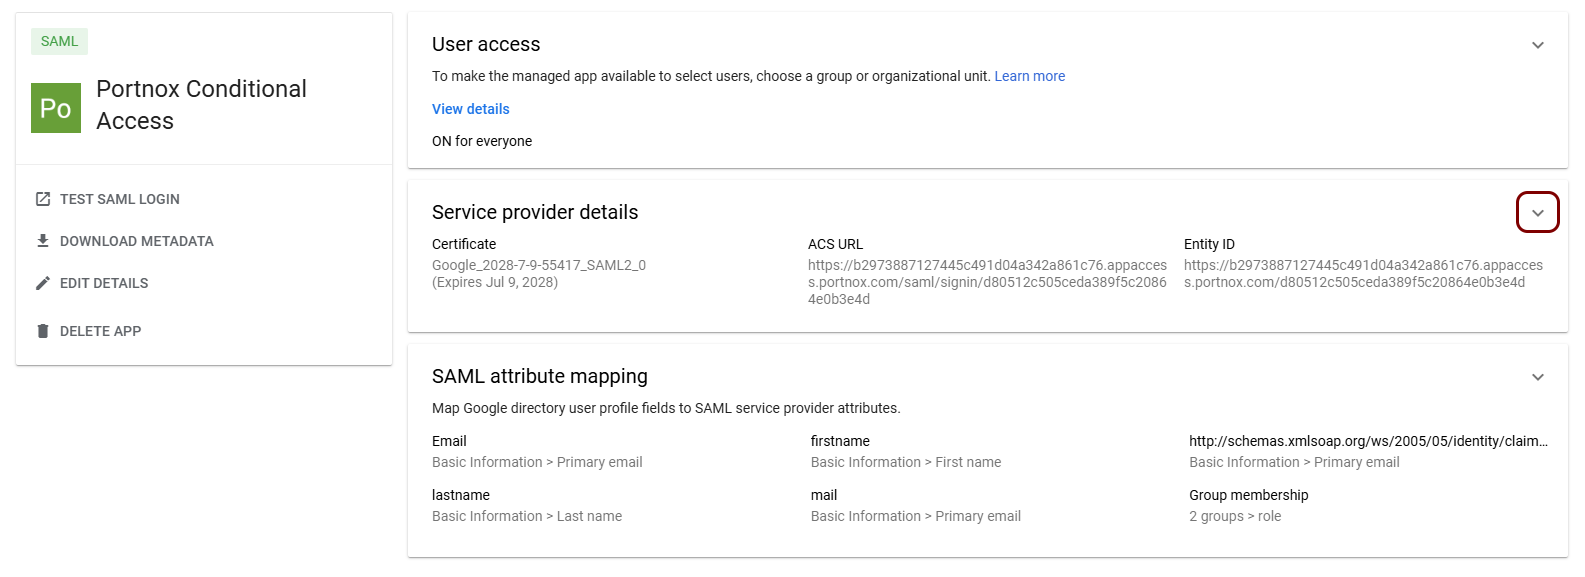
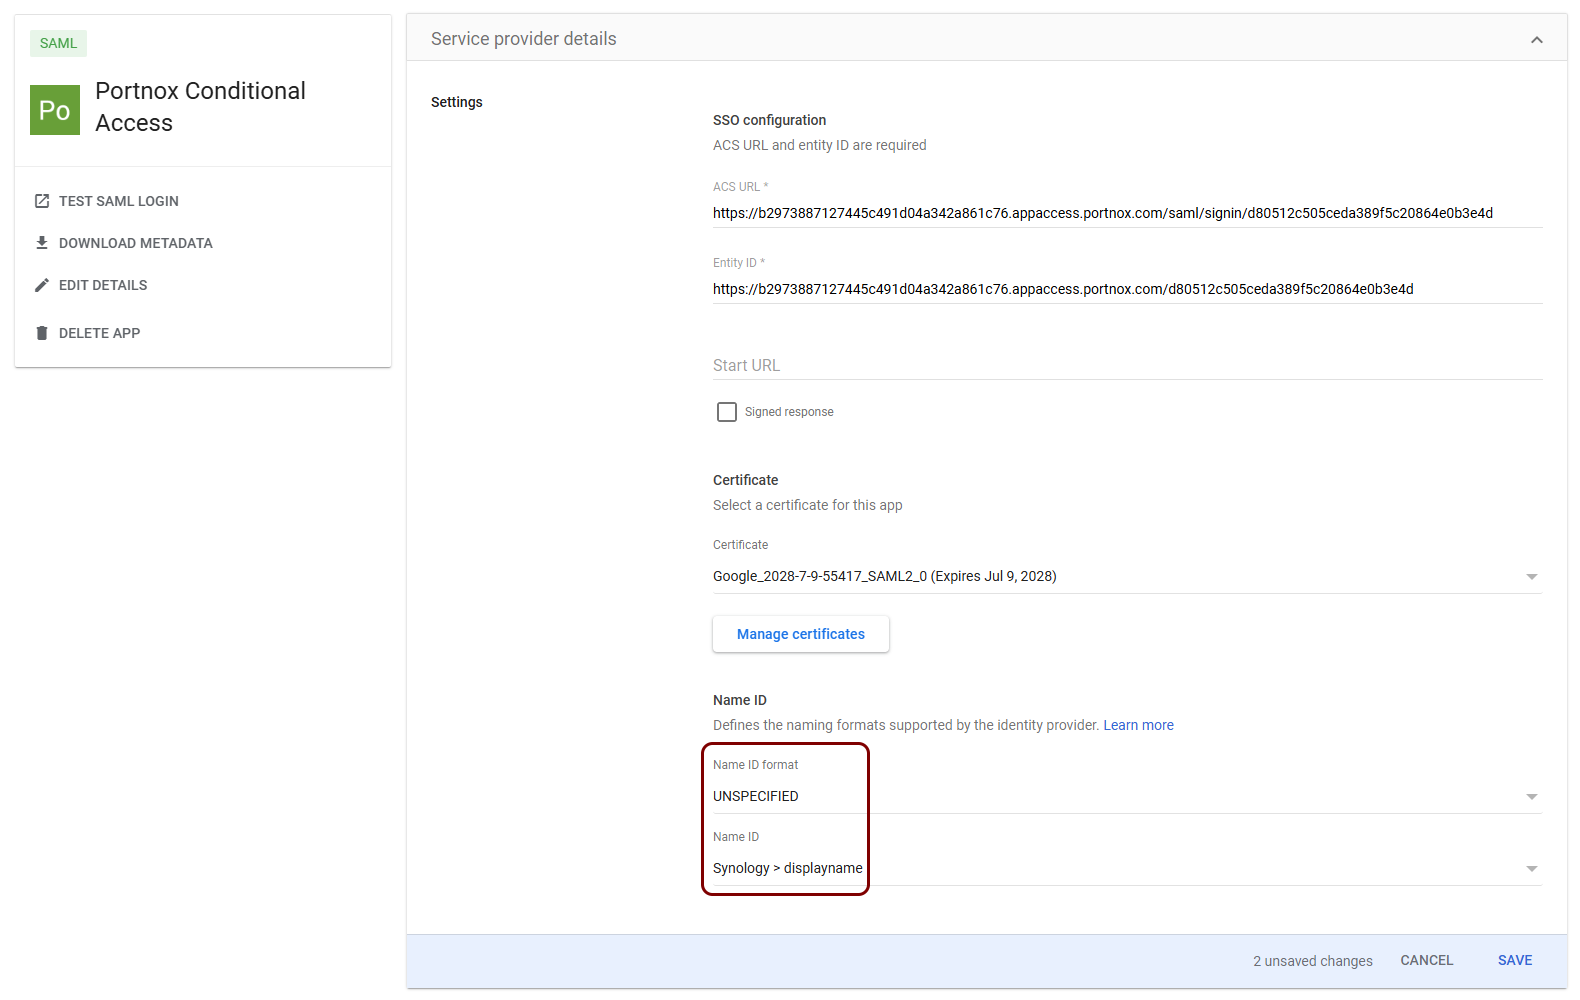
Open the Service provider details pane ().
-
In the Name ID format field, select the UNSPECIFIED option
and in the Name ID field, select the custom field that contains the Synology
username.
Note:You need to add the custom field to the Google user directory scheme and manually fill it with a correct username for every user that needs to access the Synology NAS. In this example, we created a field displayname in a custom section called Synology.
-
Open the Service provider details pane ().
Create a Portnox Cloud application configuration
In this step, you will create a configuration in Portnox Cloud that will contain all the information necessary to integrate with Synology.
-
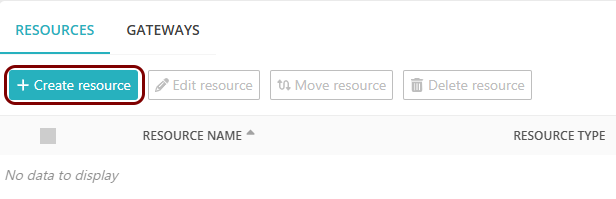
In the Cloud portal top menu, click on the Zero Trust Resources option.

-
On the Resources screen, click on the Create resource button.
-
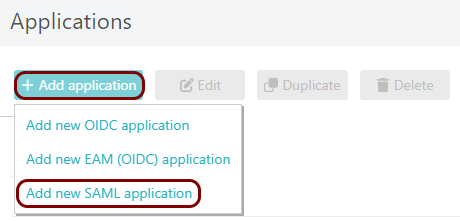
In the Authentication protocol section, select the SAML
option.
-
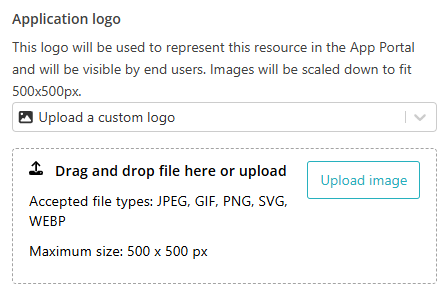
In the Application logo section, select one of the logos from the list, or select
the Upload a custom logo option and then click on the Upload
image button to upload a logo for the application.
The logo is used in the Secure Access Portal.
-
In the Authentication protocol section, select the SAML
option.
-
In the Resource details section, enter a Resource
name and optionally a Description.

In this example, we used the name Synology for the new application configuration but you can use any name you like.
Open your Synology SAML authentication setup page
In this section, you will access your Synology administrative interface and find the SAML authentication setup page.
-
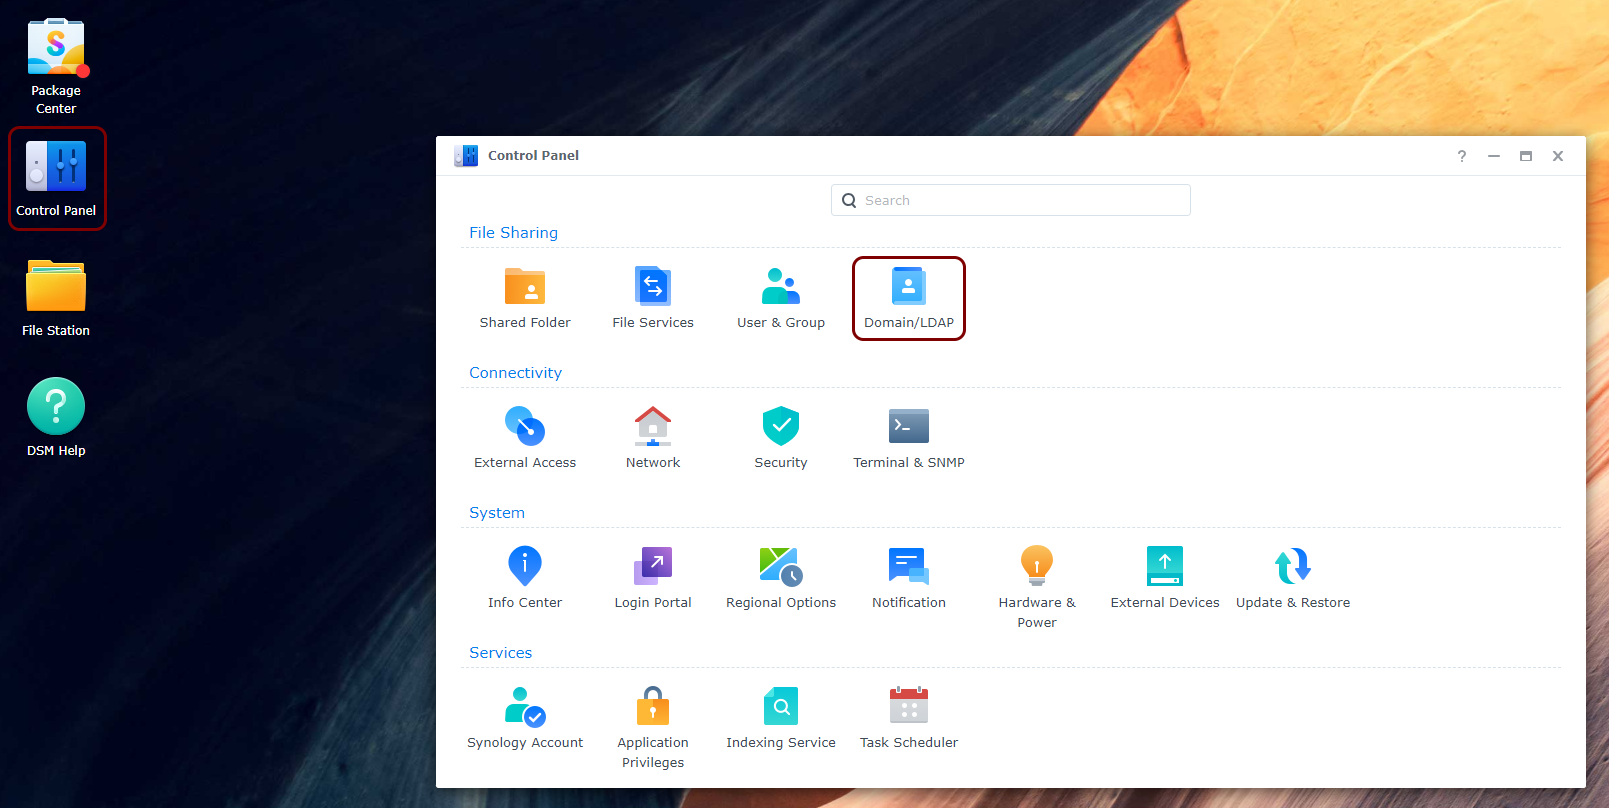
Click on the Control Panel icon, and then on the Domain/LDAP
icon.
-
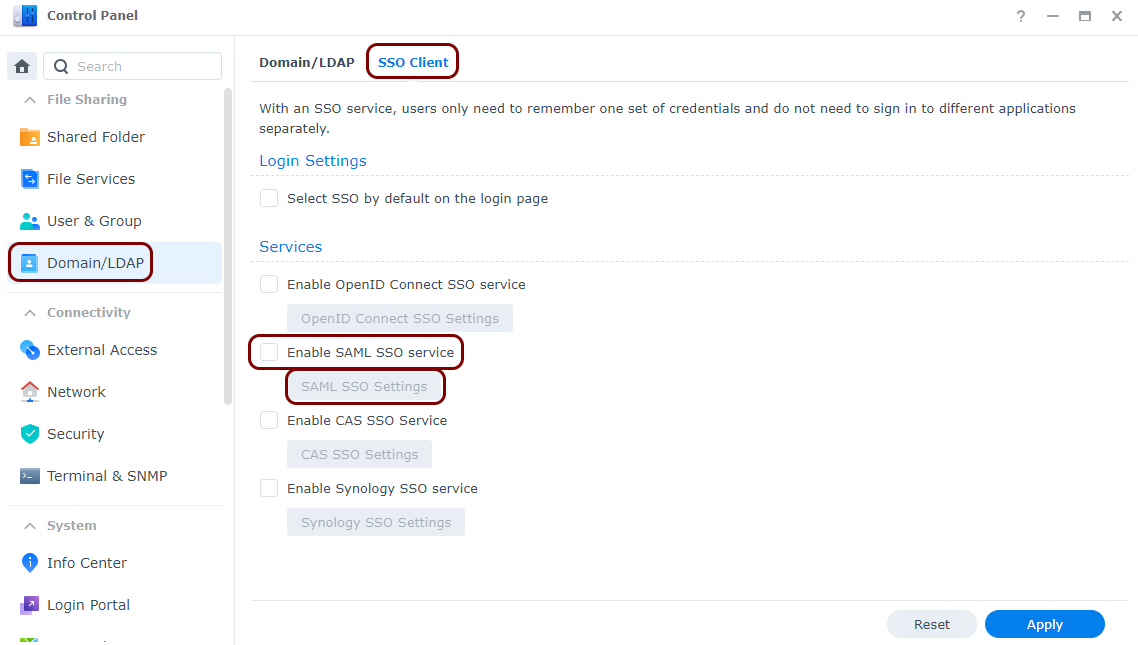
In the Domain/LDAP pane, click on the SSO Client tab, activate the
Enable SAML SSO service checkbox, and then click on the SAML SSO
Settings button..
Enter configuration values in the Portnox tab
In this section, you will enter configuration values in the relevant fields in Portnox Cloud.
-
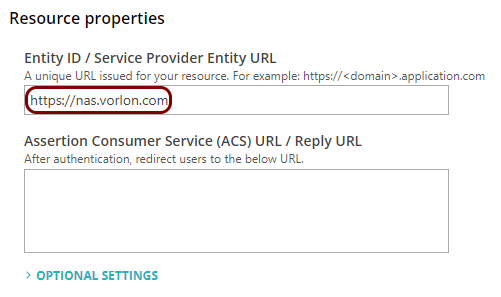
In the Portnox tab, in the Resource properties section, click on the empty field under the
Entity ID / Service Provider Entity URL heading and enter the URL that you use to access
your Synology NAS without the trailing slash, for example: https://nas.vorlon.com.
-
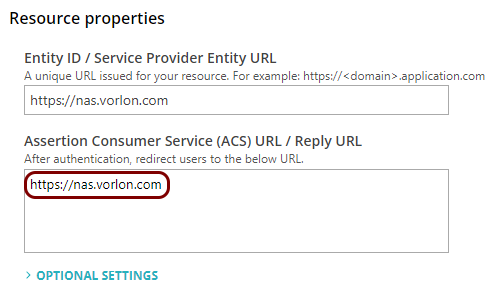
In the Portnox tab, in the Resource properties section, click on the empty field under the
Assertion Consumer Service (ACS) URL / Reply URL heading and enter exactly the same value
as the Entity ID above.
Export metadata from the Portnox tab and upload it in the Synology tab
In this section, you will export the metadata from Portnox Cloud into a file and upload that file in the Synology SAML setup section.
-
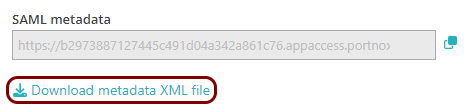
In the Portnox tab, in the SAML metadata section, click on the Download metadata
XML file link to download the XML file and save it to your local drive.
-
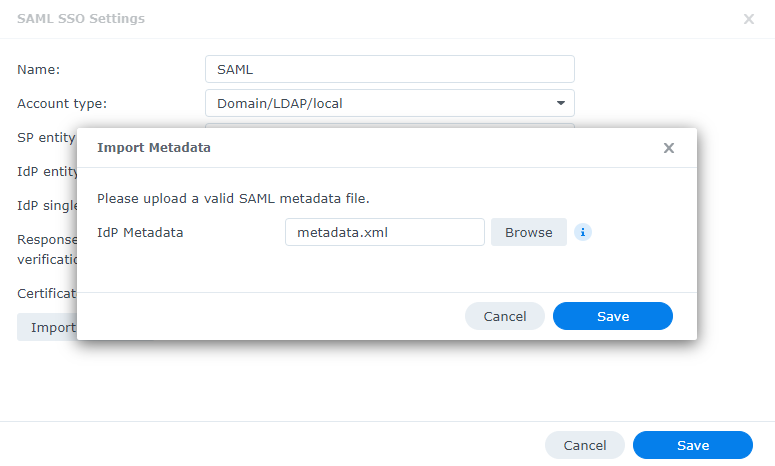
In the Synology tab, click on the Import Metadata button, click on the
Browse button, select the XML file downloaded from Portnox Cloud, and then click on the
Save button.
Finalize the configuration
In this section, you will finalize the configuration in Portnox Cloud and Synology.
-
Finalize the configuration in the Portnox tab.
-
Scroll all the way down to the end of the page, and then click on the Add resource
button.

-
Scroll all the way down to the end of the page, and then click on the Add resource
button.
-
Finalize the SAML configuration in the Synology tab.
-
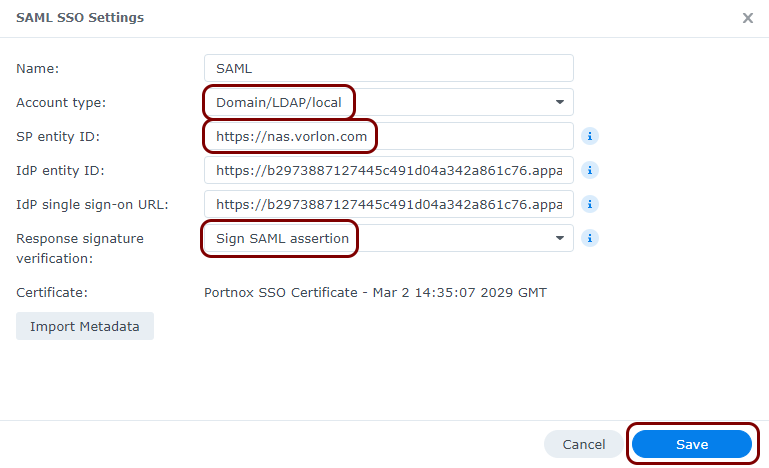
In the Account type field, select the Domain/LDAP/local
option, and in the Response signature verification section, select the
Sign SAML assertion option. Also, make sure that the SP entity
ID field contains the URL that you use to access your Synology NAS without the trailing
slash. Then, click on the Save button.
-
In the Account type field, select the Domain/LDAP/local
option, and in the Response signature verification section, select the
Sign SAML assertion option. Also, make sure that the SP entity
ID field contains the URL that you use to access your Synology NAS without the trailing
slash. Then, click on the Save button.
Result: You have configured your Synology NAS to be accessible using Portnox Zero Trust Network Access.