Integrate Egnyte with Conditional Access
In this topic, you will find general instructions on how to integrate Egnyte with Portnox™ Conditional Access for Applications.
Create a Portnox Cloud application configuration
In this step, you will create a configuration in Portnox Cloud that will contain all the information necessary to integrate with Egnyte.
-
In a new tab of your browser, open your Portnox Cloud account by accessing the following URL: https://clear.portnox.com/
From now on, we will call this tab the Portnox tab.
-
In the Cloud portal top menu, click on the Applications option.

-
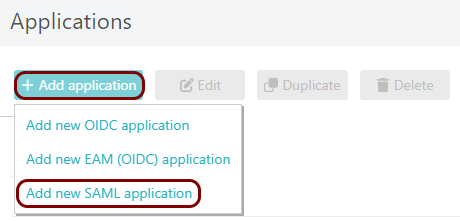
On the Applications screen, click on the Add application button, and
select the Add new SAML application option.
- Optional: If you have more than one SAML identity provider configured, select the identity provider in the Select an identity provider to use for this application section.
-
In the Application details section, enter an Application
name and optionally a Description.

In this example, we used the name Egnyte for the new application configuration but you can use any name you like.
- Keep this browser tab open. You will need it later.
Configure your Egnyte single sign-on settings
In this section, you will access your Egnyte configuration and find the single sign-on (SSO) settings.
-
In another tab of your browser, log in to your Egnyte tenant by accessing the following URL:
https://your_tenant.egnyte.com/, where
your_tenant is the name of your Egnyte tenant. Then, log in with an account that has
administrative privileges in Egnyte.
From now on, we will call this tab the Egnyte tab.
-
In your Egnyte dashboard, click on the Settings option in the left-hand side menu, then
expand the Configuration option from the second menu, and then click on the
Security & Authentication option.

-
In the Security & Authentication pane, scroll down to the Single Sign-on
Authentication section and select the SAML 2.0 value in the Single
sign-on authentication field.

-
In the Identity provider field, select the AzureAD option.
 Note: We tested other Egnyte SSO identity provider configurations, and this is the only setting that correctly supports the SAML 2.0 workflow with Portnox Cloud. This setting works for all identity providers in Portnox Cloud, including Entra ID and Google Workspace.
Export metadata from the Portnox tab and upload it in the Egnyte tab
In this section, you will export the metadata from Portnox Cloud into a file and import that file with Egnyte.
-
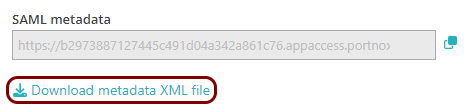
In the Portnox tab, in the SAML metadata section, click on the Download metadata
XML file link to download the XML file and save it to your local drive.
-
In the Egnyte tab, click on the import metadata XML link in the IDENTITY PROVIDER
CONFIGURATION section, and then upload the XML file downloaded from Portnox Cloud.

The Identity provider login URL, Identity provider entity ID, and Identity provider certificate fields should now include the values exported from Portnox Cloud.
Enter configuration values on the Portnox tab
In this section, you will enter relevant configuration values in Portnox Cloud.
-
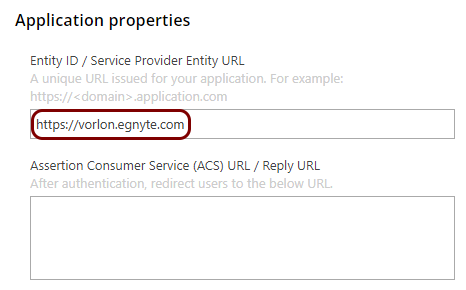
In the Portnox tab, in the Application properties section, click on the empty field under
the Entity ID / Service Provider Entity URL heading and enter the following value:
https://your_tenant.egnyte.com, where
your_tenant is the name of your Egnyte tenant.
-
In the Portnox tab, in the Application properties section, click on the empty field under
the Assertion Consumer Service (ACS) URL / Reply URL heading and enter the following value:
https://your_tenant.egnyte.com/samlconsumer, where
your_tenant is the name of your Egnyte tenant.

Finalize the configuration
In this section, you will finalize the configuration in Portnox Cloud and Egnyte.
-
Finalize the configuration in the Portnox tab.
-
Scroll all the way down to the end of the page, and then click on the Save
button.

-
Scroll all the way down to the end of the page, and then click on the Save
button.
-
Finalize the configuration in the Egnyte tab.
-
In the Default user mapping field, select the Email address
value.

-
Activate the Use domain-specific Issuer value switch.

-
Click on the Save changes button.

-
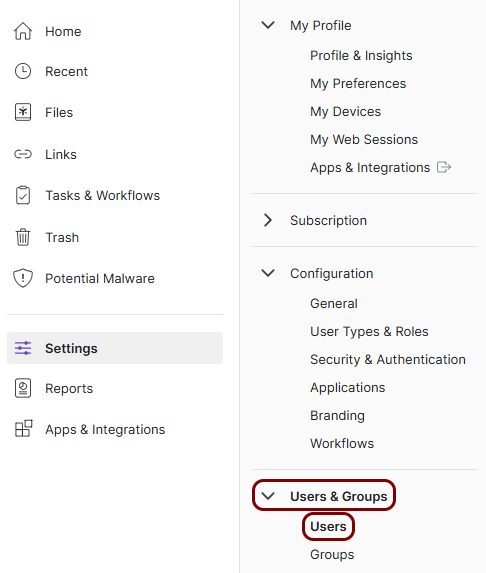
In the left-hand side Settings menu, expand the Users &
Groups option, and then click on the Users option.
-
For each user that you want to use Conditional Access for Applications, hover over the user entry in the
table, and then click on the Details button

-
In the user details pane, in the Profile tab, change the
Authentication field value to SSO, and then click on the
Save button.
 Important: Only Power User and Administrator accounts (including service accounts) have access to SSO, standard users do not. We recommend that you create at least one administrative user or service account with regular password login, in case of any problems with SSO sign-in.
-
In the Default user mapping field, select the Email address
value.
Result: You have configured Egnyte to be accessible using Portnox Conditional Access for Applications.